There are three ways to sell on Facebook, they are as follows:
- Facebook Shops,
- Facebook Marketplaces, and
- Facebook Buy and Sell groups.
Facebook Shops
As an eCommerce seller, you can attract your desired audience, increase your brand awareness, and increase your sales potential with Facebook shops.
With Facebook, you can set up a fully functioning online store using your Facebook business page. With this, customers can purchase an item without leaving Facebook.
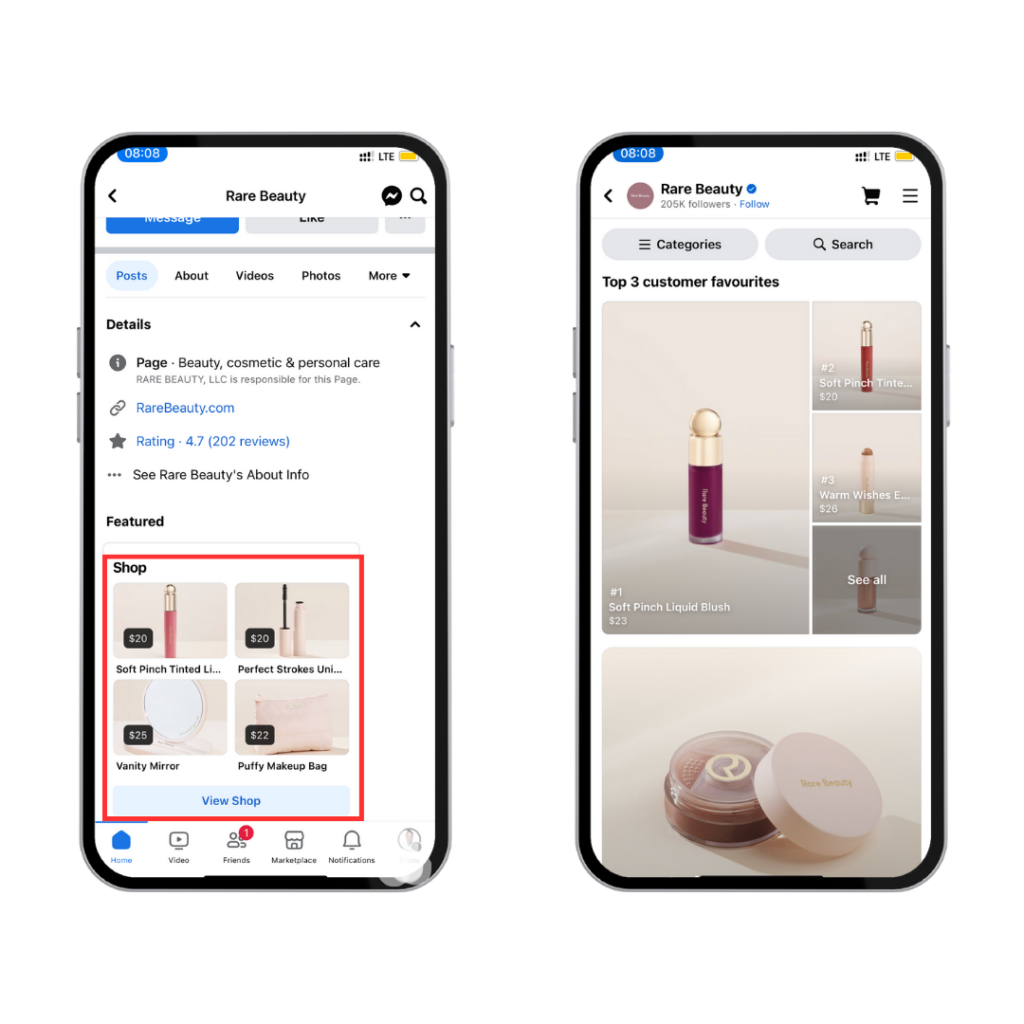
For example, Rare Beauty uses Facebook to attract buyers and makes it easier for them to browse and buy products using the Facebook shop featured on their page.
Facebook Marketplace
The Facebook Marketplace is a feature on Facebook that allows its users to discover, buy, and sell products on the platform.

The feature was introduced to Facebook in 2016 and became popular among users, who use it to buy and sell items locally.
Like Craigslist, the Facebook Marketplace was known as the best place to buy and sell old items.
But as it became more and more popular, eCommerce businesses saw the platform as a great opportunity to reach more customers.
MORE: How to sell on Amazon
Facebook Buy and Sell groups
Buy and sell groups are a considerable approach to selling your products on Facebook, although it’s a little different from how you’d approach selling on Facebook shops and marketplace.
This difference is that you can’t list products as you wish on Facebook groups. The groups aren’t yours, so you’ll have to adhere to the rules of each group you join.
Also, you can crosspost your listing to other groups if you don’t want to waste time posting to each group separately.
How to Sell on Facebook Shops
To sell on Facebook Shops, follow these steps:
1. Create a Facebook business page,
2. Log in to Facebook business manager,
3. Create your shop,
4. Choose check out method,
5. Choose sales channel and catalog,
6. Set shipping and returns,
7. Submit your shop.
Step 1: Create a Facebook business page
In order to create a Facebook shop to display your products, you need to have a business page. You can create a business right from your personal account if you don’t have one.
Click the menu icon on the top right corner of your Facebook account, and select ‘Page’ from the ‘Create’ menu.
From here, you’ll be able to provide information about your business, including photos,business name, phone number, and so on.
Step 2: Log in to Facebook Business Manager
Once you have a business page, your page automatically connects to your business manager account.
However, in some cases, you’ll need to create a business account or connect the page for which you want to create a Facebook shop.
To access Business Manager on Facebook, go to business.facebook.com and click ‘All tools’ from the left side navigation menu. Under ‘Sell products and services’, select ‘Commerce’.
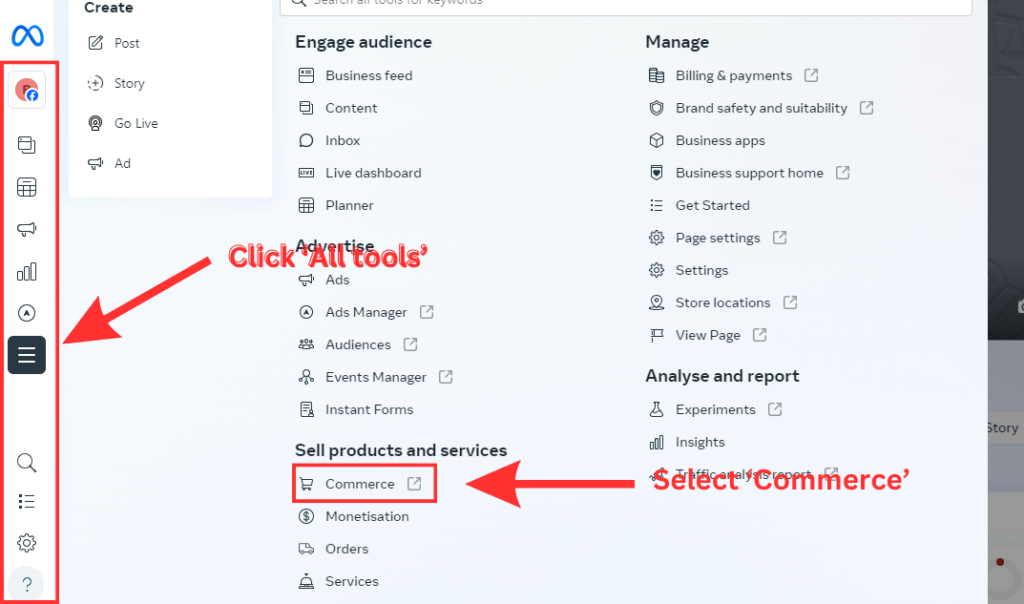
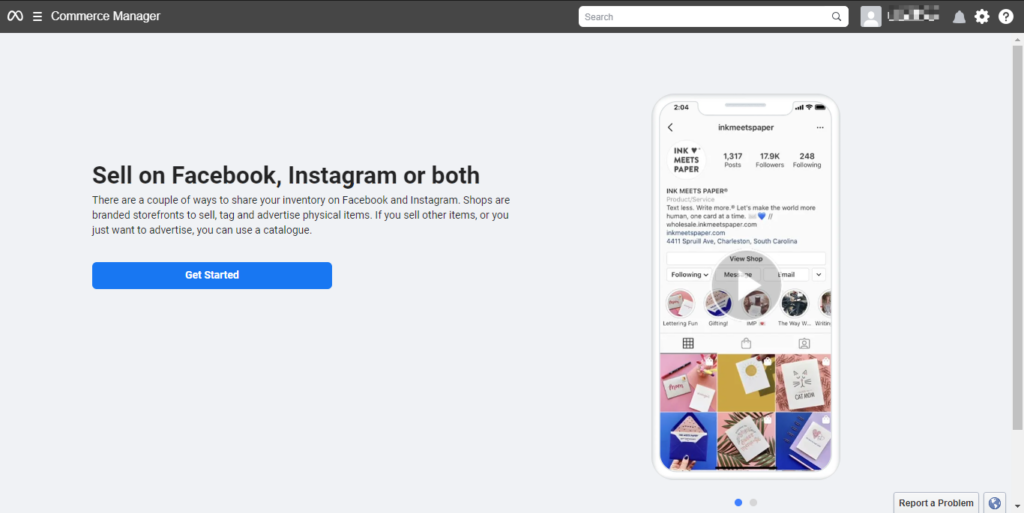
This will bring you to the commerce manager, where you can get started to set up your Facebook shop.
Step 3: Create your shop
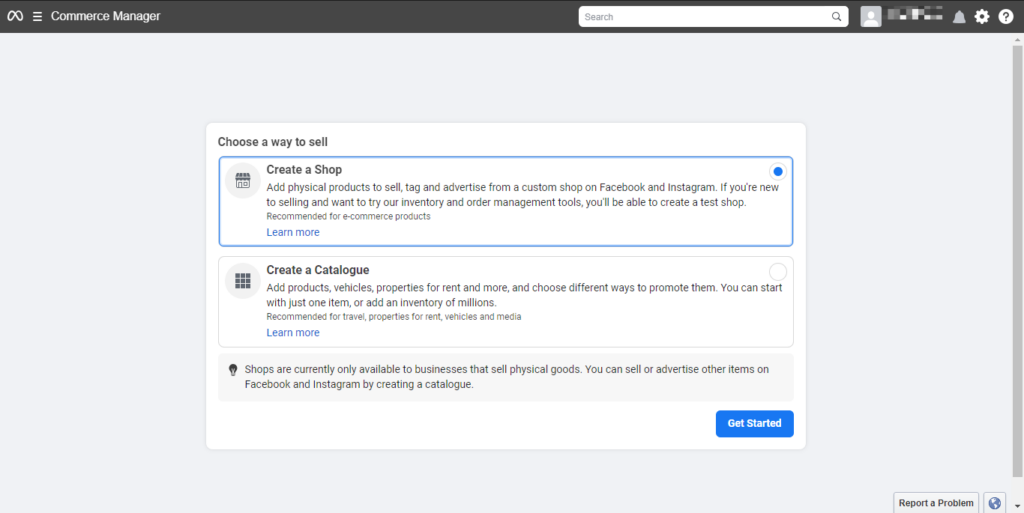
Once you have clicked ‘Get started’, select ‘Create a shop’ to add your products, then click the ‘Get started’ button.
If you use Shopify, Bigcommerce, or any other eCommerce platform, you can easily integrate with your already existing online store in seconds.
Select the option ‘Integrate with partner platforms’ to set up and manage your shop using your partner platform. Then click ‘Next’ to follow the process to create your shop.
MORE: 11 Best Ecommerce Platforms for 2024
Step 4: Choose checkout method
From here, you’re to choose the check out method where you want your customers to complete their orders.
Once you click ‘Get started’, select ‘Create a shop’ to add your products, then click ‘Get started’. Here, you have three check out methods to choose from;
- Your website: Choosing this method will direct your customers to your online store to check out.
- Check out on Facebook: With this method, customers buy items and check out directly on Facebook.
- Check out with messaging: This method allows customers to contact you through Facebook Messenger or WhatsApp to arrange payment.
We recommend that you choose to directly check out on Facebook to avoid potential check out issues when customers are directed to your online store.
With the Facebook check out option, you make it convenient for customers to complete their orders without any friction.
Step 5: Choose sales channel and catalog
Next, select the page you want to add your shop to. You can either choose your Facebook business page or your Instagram business page as your sales channel.
Select the page and click ‘Next’, then connect your business manager account. Then, click the ‘Next’ button.
On the next page, choose the catalog you want to add to your store, then click ‘Next’.
Make sure your catalogue meets the catalog eligibility requirements for Facebook shops.
Step 6: Set shipping and returns
Choose how you’ll fulfill orders and provide information on how you’ll handle returns.
Include your shipping costs, the locations you ship to, cart minimum, estimated delivery days, and the number of days buyers have to return items purchased.
In addition, provide customer service email address so that customers can reach you for support.
Also, you can let customers subscribe to your email list at checkout or on your shop’s home page.
Once you’ve provided all the information needed, click ‘Next’.
MORE: Options for Handling International Returns
MORE: ShippyPro
Step 7: Submit your shop
Preview your shop details, read and agree with Facebook’s seller agreement, and then click ‘Finish setup’.
After you submit your shop, you’ll want to follow the prompts to provide your business details, such as business category and type, address, bank details, tax registration number, federal tax identification number, and so on, to set up payouts.
You can now manage your catalog, customize your shop and create collections to make it easier for customers to find and buy products they’re interested in.
If you’ve integrated your Facebook shop with a partner platform, Facebook automatically connects your catalog on the platform to your Facebook shop.
How to Sell on Facebook Marketplace
The following are 7 easy steps to selling on Facebook Marketplace:
- Log in to Facebook,
- Access Facebook Marketplace,
- Create listing,
- Choose listing type,
- Provide product listing details,
- Set your delivery method,
- Choose private settings.
Step 1: Log in to Facebook
To sell on Facebook Marketplace, you must have an active Facebook account.
If you don’t have a Facebook account, you can create one by signing up on Facebook.com and providing your personal details.
These include your name, email address, phone number, password, and date of birth.
Step 2: Access Facebook Marketplace
You can access the Facebook Marketplace either on your desktop or mobile device.
On a desktop, the marketplace feature is located on the left side bar of your Facebook feed.
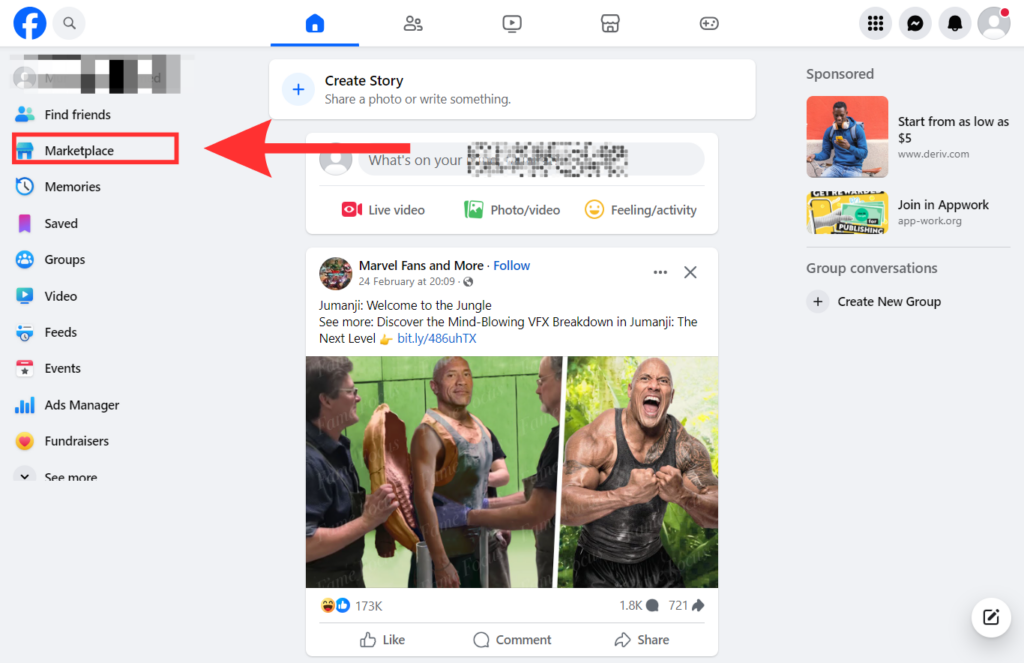
To access the Facebook marketplace on mobile, scroll to the bottom of your feed.
Then, click ‘Marketplace’.

Step 3: Create listing
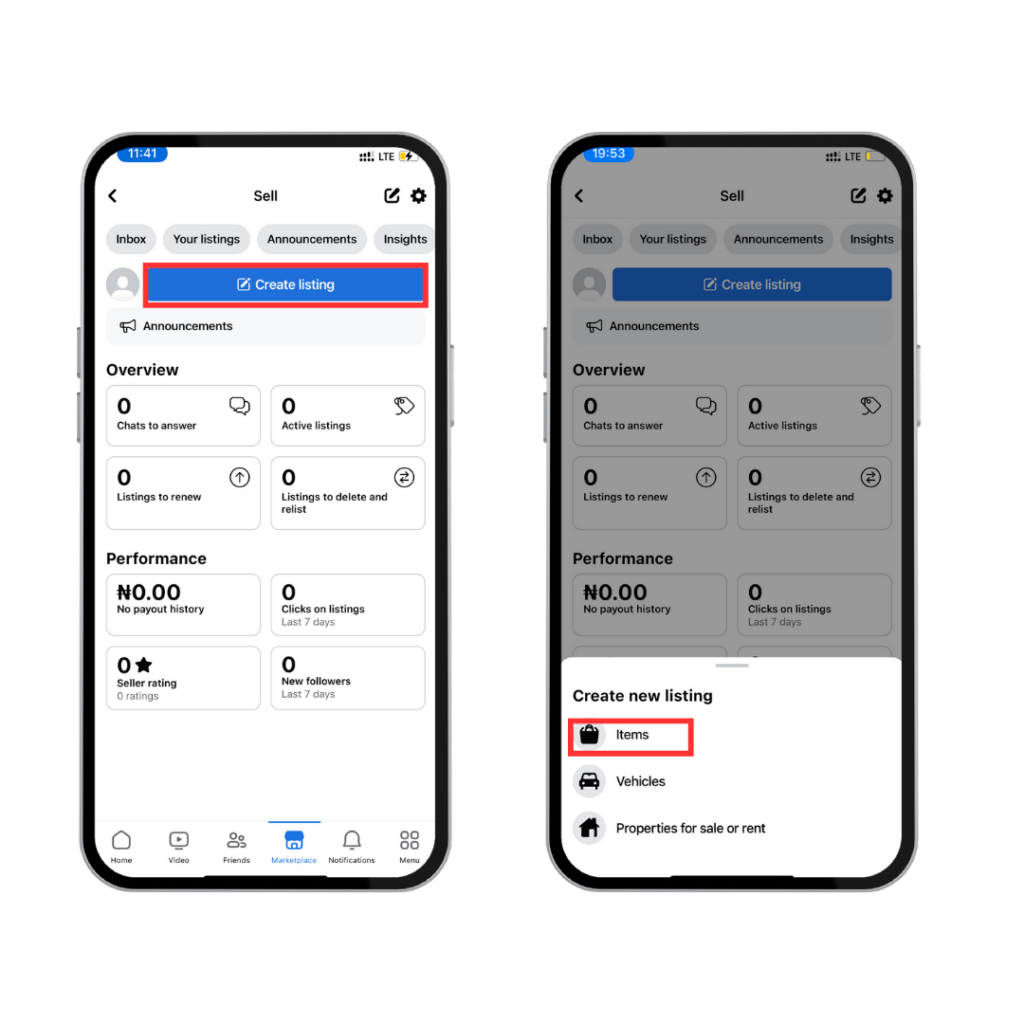
To create a product listing using the mobile app, tap ‘Sell’ on the top left corner of your screen. Then, click ‘Create listing’.
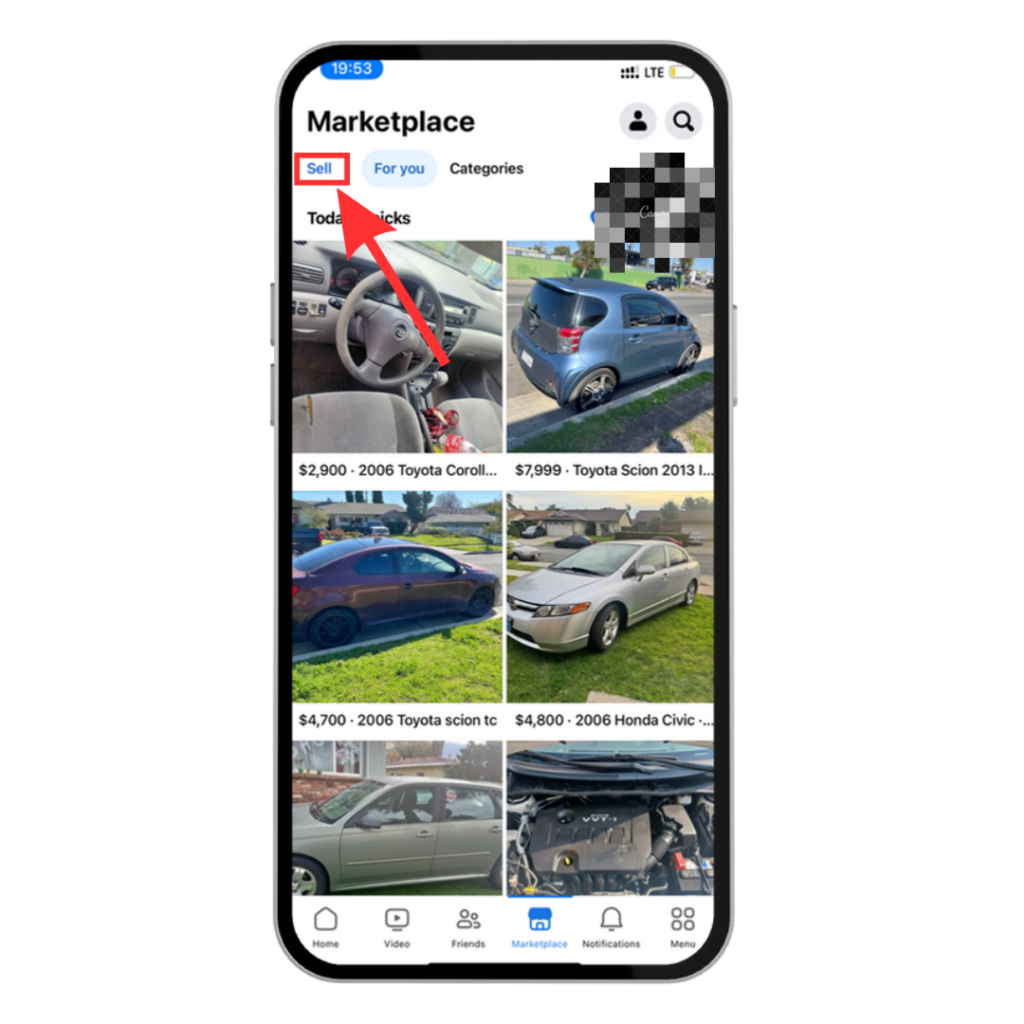
If you’re using a desktop, click ‘Create new listing’ on the left sidebar of the screen.
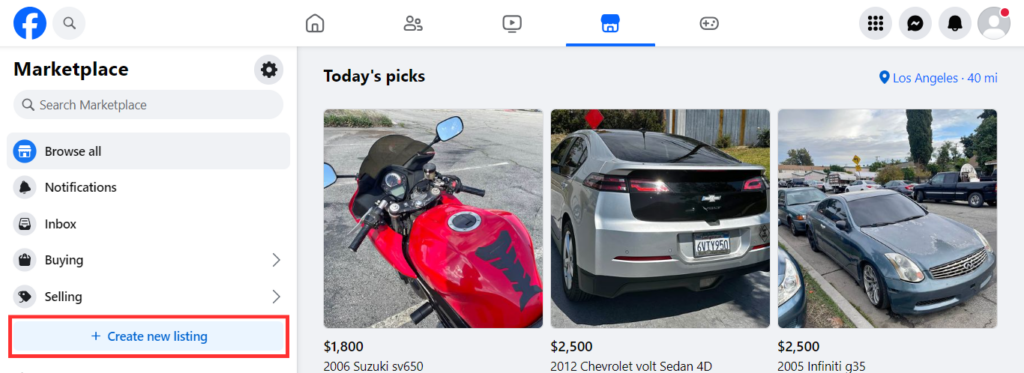
Step 4: Choose listing type
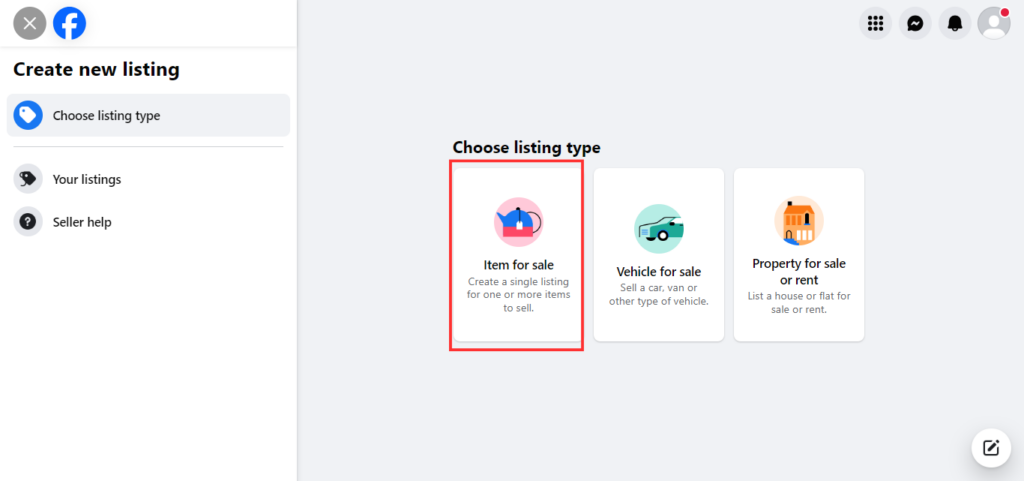
Once you select ‘Create new listing’, the page will prompt you to choose the type of product you want to sell.
Select the type of product you want to sell, either items, vehicles, or real estate. However, in this guide, we’re going to select ‘items’.
On desktop
On mobile
Step 5: Provide product listing details
Once you select the product type you want to sell, add your item details.
This includes photos, product description, price, category, product condition, and availability.
After that, you can click the toggle if you want to hide your listing from your friends.
Then, tap the ‘Next’ to choose where you want your product to be listed.
On desktop
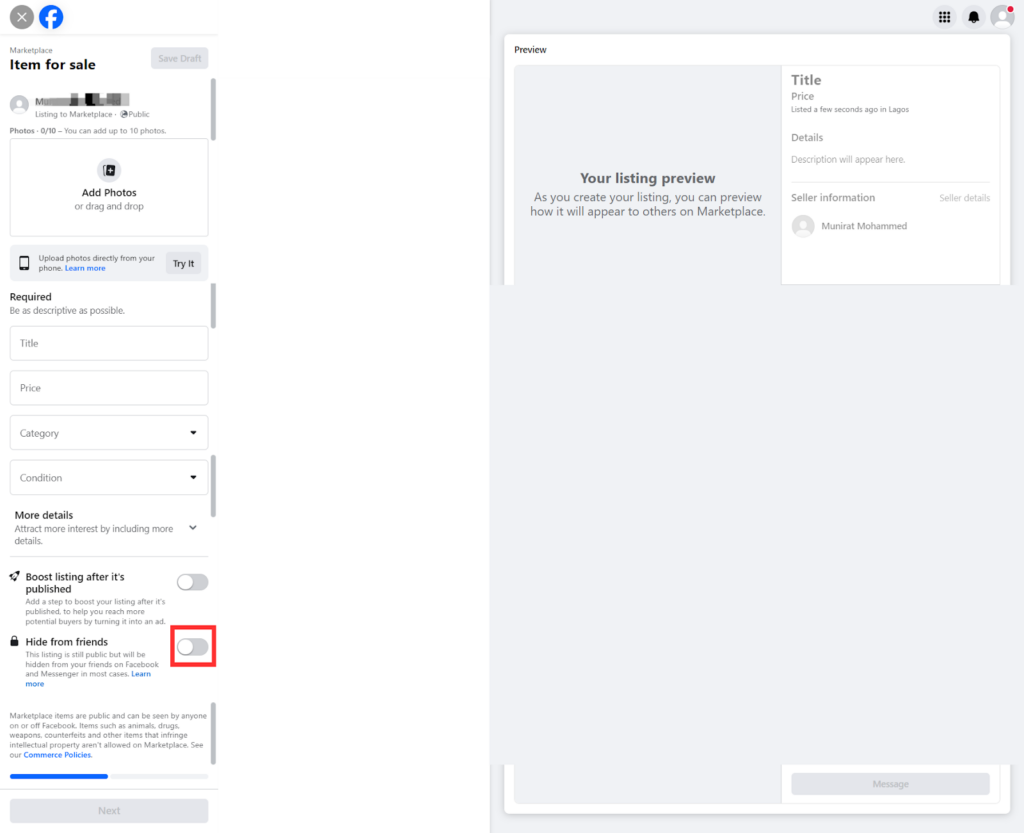
You can choose to list your products publicly in the marketplace, in Facebook groups, or both. Then click ‘Publish’.
Step 6: Set your delivery method
On mobile
After adding your product details, scroll down. Click ‘Additional listing options’ to set up your delivery method.
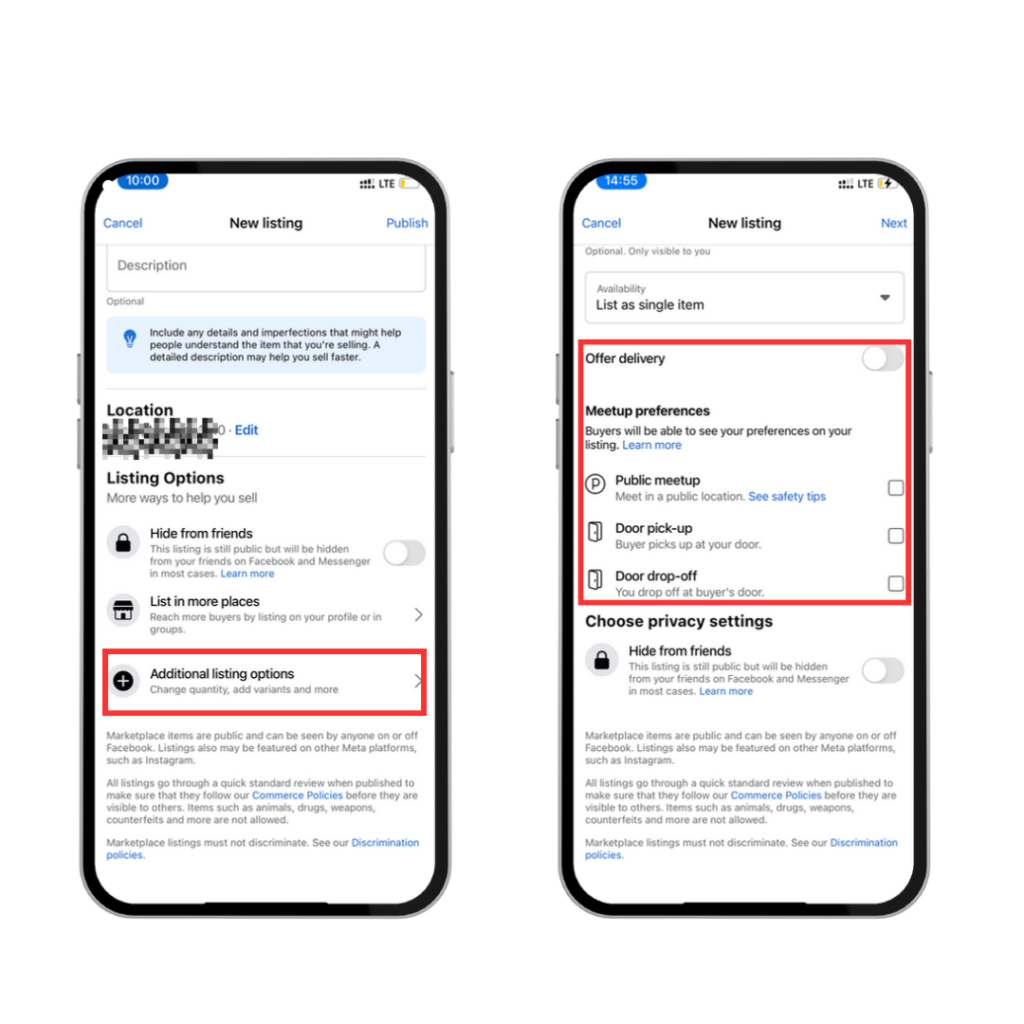
Facebook Marketplace allows you to choose from the following delivery methods:
Shipping only: You can choose to offer delivery by clicking the toggle button.
You’ll then fulfill your customer’s order and arrange with a shipping and logistics company to deliver the item to your customer.
Public meetup: You can arrange with your buyer to meet up at a public location and deliver the item.
Door pick-up/drop-off: With this method, the buyer either picks up at your location or you drop the item at the buyer’s door.
Please note that setting delivery methods is only applicable on mobile, not desktop.
Step 7: Choose private settings
On mobile
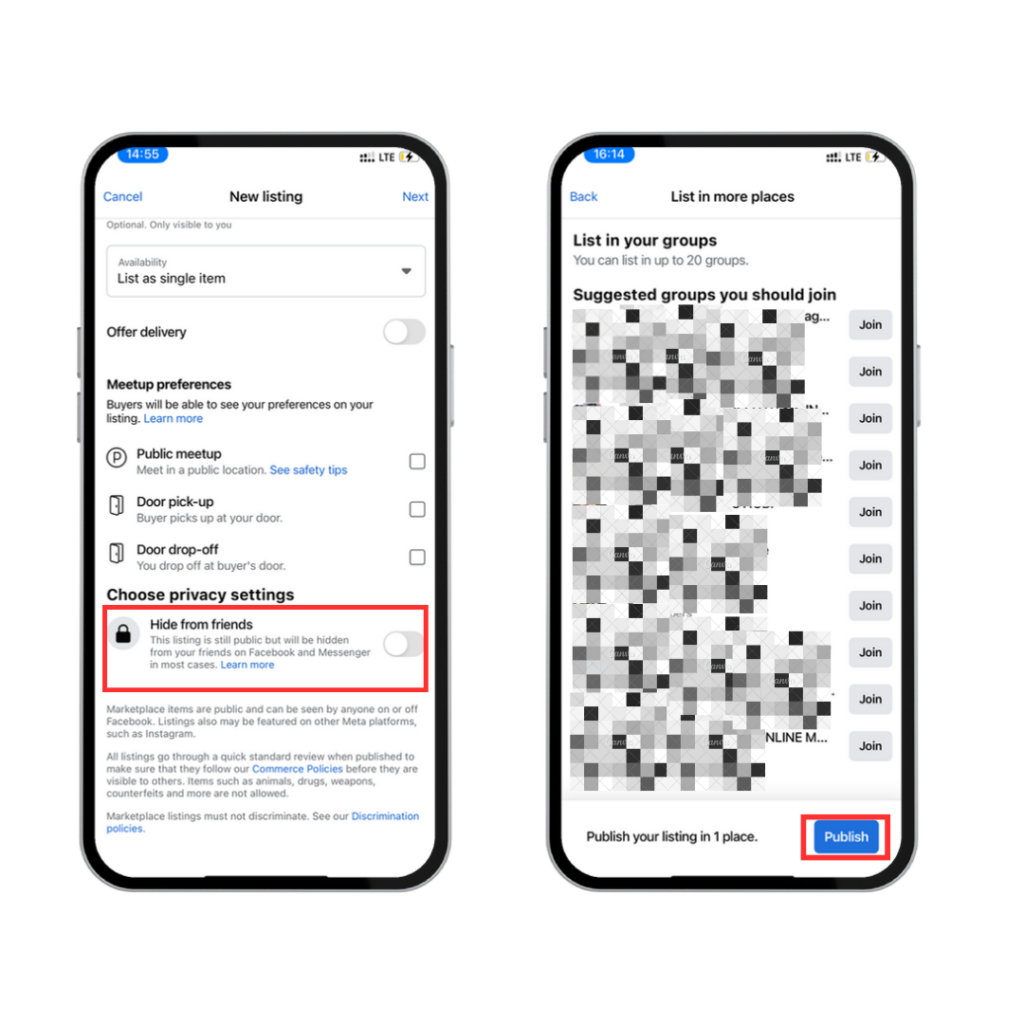
Click the toggle button to hide your product listing from your friends. Then click ‘Next’ to select where you want to post your listing.
Then, click the ‘Publish’ button at the bottom of the screen.
Your product will be live on the Facebook marketplace.
If you own an eCommerce store, listing your products on Facebook Marketplace one by one can take a lot of time.
Alternatively, you can create a Facebook shop using your Facebook business page.
You can then enable Facebook Marketplace as a sales channel through the Commerce Manager tool in your business manager.
With this, you give customers the option to buy your products through the Facebook marketplace, your Facebook shop, or your online store.
Why Should You Sell on Facebook Marketplace?
Selling on Facebook Marketplace is a great way to expand your customer base and make more sales.
Facebook provides sellers with a larger customer base, with 3 billion active users using the platform monthly and about 1 billion users visiting Facebook marketplace every month.
As the eCommerce industry becomes increasingly omnichannel, Facebook Marketplace gives you a chance to benefit from the social interactions taking place on the platform.
MORE: Omnichannel vs Multichannel
Benefits for Selling on Facebook Marketplace
Here are seven key benefits of using Facebook Marketplace for your business.
1. Massive brand exposure
Every month, over 1 billion people search for products on Facebook Marketplace. With this large customer base, selling your products on the platform exposes your brand to potential customers.
It increases brand awareness and, as a result, boosts sales.
2. Free product listing
Facebook Marketplace is different from Amazon, eBay, and Etsy.
It allows you to post and manage product listings for free. This will help you maximize your profit margin.
However, you only pay a % fee for the product price once you make a sale.
This fee includes taxes and the cost of the payment process. It varies depending on the payment processor used.
You only pay this fee if you use Facebook and Instagram shops.
| Payment processor | Transaction fee |
|---|---|
| Card | 2.9% |
| PayPal | 3.49% |
| Shop pay | 2.9% |
3. Target local buyers
Facebook Marketplace makes it easy to target interested buyers who are looking to buy items that you sell within your geographic location.
This will make shipping to local customers much easier and affordable, as location and shipping costs are top barriers for eCommerce businesses.
4. No requirements
Unlike Amazon and Walmart, where you’d have to provide and verify certain documents, you have to be approved before you can sell on the platform.
You need no approval or qualifications to sell on Facebook Marketplace.
You can post your item for sale without having to go through any complicated processes.
MORE: How to sell on Walmart marketplace
5. Increases customer engagement
Facebook Marketplace helps increase customer engagement through
direct-customer messaging.
Buyers can message you directly to inquire about your products through Facebook Messenger or WhatsApp.
6. Builds brand authenticity
Facebook Messenger allows you to talk directly with your customers and maintain good communication with them. This gives them the confidence to trust your brand, therefore building your brand’s authenticity.
7. Boost conversion rates
Facebook Marketplace helps boost your conversion rates. It does this by exposing your brand to a larger audience for free.
This generates traffic to your online store, builds brand awareness and trust, and increases your customer retention rate.
Takeaway Points
Facebook Marketplace is a great option for ordinary individuals and eCommerce businesses looking to sell their products.
Whether handmade products or obsolete items, the platform helps connect sellers with interested buyers.
But as more and more sellers use this platform, there will be more intense competition among sellers.
By implementing the tips we’ve provided in this guide, you can maximize its selling possibilities and stand out from the competition.

Have any eBay sellers had any luck here? Can you import listings from other selling platforms?
Hi Greg,
In speaking to the experience within Zentail, the answer is a resounding YES> products can be loaded from other platforms. Within Zentail, this is an simple process that can list and properly categorize your entire catalog within minutes.
Also yes: our customers are all multi-channel sellers, and those who have been successful on eBay have also seen success on Facebook Marketplace.
Hope that helps!